Footwork Makes You Smarter
I like to say footwork makes you smarter. All things being equal in terms of athleticism, it’s footwork that will make you a more effective player a more efficient player. You need to let your feet get you to a spot where your hands can take the shot. You need to be able to create space from your defender. When creating space, we need to think three dimensionally. We don’t just want to create some space on the floor, but also in the air.
I like to introduce footwork drills into our practice warm up. It’s a good way to get repetitions and a good way to ingrain footwork that you want established in dribbling and shooting drills.
Each one of these footwork dance-steps, we do for a full length of the floor. It’s a good way to help get warmed up and work on your footwork at the same time.
You can do these footwork drills without a ball. I tell my players they can get repetitions in on the way to super, on the way to the washroom, on the way to their next class. Do you care more about getting better than looking different from the rest?
Teaching Points
1. Athletic Stance
• Seat down
• Straight back with your chest up
• Eyes down court
• Legs at a less than 90 degree angle and on the balls of your feet
2. Ball Handling
• Keep the ball below knee and outside of knee on
• On dribble moves keep the ball low, shoe lace high, and receive the ball low. Remain ball quick by keeping the ball low.
3. Explosive
• Foot first ball second. The ball needs to be out of your hand before your pivot foot lifts.
• Explosive steps. Your first step should be low and long.
• The ball should be passed out to yourself. You should lead your with the ball when you make your move.
4. Shot Fakes
• Jab steps should be short quick and violent. You only need to jab about six inches to the reaction of your defender.
• Seat should drop during shot fake.
• The ball should rise above the brow.
• Eyes should draw a bead on the rim.
• All three of these motions should happen simultaneously.
Kobe Dance Steps
Use one length of the floor baseline to baseline for each of the three footwork moves. Make sure you are low and athletic. Foot first ball second. Pass the ball low to your opposite hand, and receive the ball low.
Nash Dance Steps
Shot fake, 1 dribble right and 2-step into shot
Shot fake, 1 dribble left and 2-step into shot
Shot fake, 1 dribble right, step-out
Shot fake, 1 dribble left, step-out
Shot fake, 1 dribble right, step-hop
Shot fake, 1 dribble left, step-hop
Wednesday, August 11, 2010


Tuesday, August 10, 2010
Ballers – What Can We Learn From Other Sports?
Football
There is an inherent toughness build into this sport. You can’t be effective playing this sport if you do not like contact. Although there is not near the same amount of contact in basketball, ask anyone that has played in the post or driven to the hoop, there is plenty of contact to be dealt with. The physical toughness of football translates into a mental toughness that is required to play both sports. Football players have long trained for speed, strength, agility and quickness. In the game of basketball you are falling behind these days if you are not following suite and working on your body. Not only will it make you a more explosive athlete, but it will help ward off injuries.
Golf
Is there a sport that requires more concentration? Not only is there a huge mental factor to the game of sports, but a golf swing and the technique required to perform properly certainly rivals the technique required to shoot a basketball effectively. Golfers are looking to improve by honing their golf swing, looking to perfect it. Basketball players should be looking for those types of nuances in their shooting mechanics. Basketball players should also actively work on their mental game, to become more focused and more confident.
Volleyball
The two biggest parts of volleyball that I have observed: 1) teammates really rely on each other to get the job done. Each player’s roles can be specific but there are certain skills that all must be able to do. If you can’t receive a serve, you will be centered out and it will have a bad outcome for your team. Good teams are skilled and trust each other, and they spend considerable time in their rituals between points cementing that culture. 2) Volleyball player’s ability to shuttle their focus between plays. Point ends, they group together, cheer or encourage, then right back to being focused on the next point. Basketball players could do well to learn to trust each other as teammates and to shuttle their focus. Clear their head on bad plays and get focused on the next task. We have all seen players celebrating too much on a good offensive play only to get burned at the other end, because their minds were not focused on the next task of getting a stop.
Body Building
Introspective, self-assessing and self motivated. You have to possess these qualities to be successful in this sport. Basketball players need to take stalk of where they are, where they want to go, and how to get there. Moreover they need to have the self motivation to do it on their own. Basketball players are built in the off-season. Teams are built during the season. It’s not uncommon depending on how your practices are run, to actually become less skilled during the season. If your team does not shoot much in practices or run ball-handling drills, then you can see those skills can diminish over the course of a season. Can you be honest with yourself, take a hard look at where you are, and be motivated to work constructively on getting better? That’s what body builders are constantly doing. Looking at their symmetry, their size and making a plan to change what needs to be changed.
Rowing
Communication is essential in rowing. So much so, that the sport has gone high tech with microphones and speakers built right into the cox box. The cox box gives specifics for stroke rate, stroke count and time. It is the responsibility of the coxswain to guide the crew in the perfect execution of a race plan. In basketball the single most effective thing you can teach your players how to execute team defensive principles is to get them to talk on defense. Communication between the 5 players on the floor can elevate the teams effectiveness.
There is an inherent toughness build into this sport. You can’t be effective playing this sport if you do not like contact. Although there is not near the same amount of contact in basketball, ask anyone that has played in the post or driven to the hoop, there is plenty of contact to be dealt with. The physical toughness of football translates into a mental toughness that is required to play both sports. Football players have long trained for speed, strength, agility and quickness. In the game of basketball you are falling behind these days if you are not following suite and working on your body. Not only will it make you a more explosive athlete, but it will help ward off injuries.
Golf
Is there a sport that requires more concentration? Not only is there a huge mental factor to the game of sports, but a golf swing and the technique required to perform properly certainly rivals the technique required to shoot a basketball effectively. Golfers are looking to improve by honing their golf swing, looking to perfect it. Basketball players should be looking for those types of nuances in their shooting mechanics. Basketball players should also actively work on their mental game, to become more focused and more confident.
Volleyball
The two biggest parts of volleyball that I have observed: 1) teammates really rely on each other to get the job done. Each player’s roles can be specific but there are certain skills that all must be able to do. If you can’t receive a serve, you will be centered out and it will have a bad outcome for your team. Good teams are skilled and trust each other, and they spend considerable time in their rituals between points cementing that culture. 2) Volleyball player’s ability to shuttle their focus between plays. Point ends, they group together, cheer or encourage, then right back to being focused on the next point. Basketball players could do well to learn to trust each other as teammates and to shuttle their focus. Clear their head on bad plays and get focused on the next task. We have all seen players celebrating too much on a good offensive play only to get burned at the other end, because their minds were not focused on the next task of getting a stop.
Body Building
Introspective, self-assessing and self motivated. You have to possess these qualities to be successful in this sport. Basketball players need to take stalk of where they are, where they want to go, and how to get there. Moreover they need to have the self motivation to do it on their own. Basketball players are built in the off-season. Teams are built during the season. It’s not uncommon depending on how your practices are run, to actually become less skilled during the season. If your team does not shoot much in practices or run ball-handling drills, then you can see those skills can diminish over the course of a season. Can you be honest with yourself, take a hard look at where you are, and be motivated to work constructively on getting better? That’s what body builders are constantly doing. Looking at their symmetry, their size and making a plan to change what needs to be changed.
Rowing
Communication is essential in rowing. So much so, that the sport has gone high tech with microphones and speakers built right into the cox box. The cox box gives specifics for stroke rate, stroke count and time. It is the responsibility of the coxswain to guide the crew in the perfect execution of a race plan. In basketball the single most effective thing you can teach your players how to execute team defensive principles is to get them to talk on defense. Communication between the 5 players on the floor can elevate the teams effectiveness.
Tuesday, July 27, 2010
Would you prevent your players from breathing?
Would you prevent your players from breathing? Then why use hydration as a reward or punishment for your players. This blog will not cover the pros and cons of water versus sports specific drinks. It will not cover how much you should drink, or pre, mid and post hydration techniques. I’ll leave that for another blog. It’s more about the mind set of coaches controlling their players’ health by denying them a drink of water. Water accounts for around 70% of your body weight, the loss of even a tiny fraction of this water can significantly reduce your performance, which is why maintaining good hydration is vital for all serious athletes.
I’m old, old enough to remember that in order to get a drink of water during school I would have to raise my hand and ask for permission. Today it is common for students to have a bottle of water on their desk. Which method is more humane and less disruptive? Do you really want that much control? Do you really want to answer the question “can I get a drink of water”? I have three children. Those parents with multiple children know if you have to explain something once, surely you will have to do it for as many children you have. The same holds true if you are the type of coach that needs to grant permission for a drink of water. Don’t you want your players to learn how to manage that, as long as it doesn’t affect or delay your practice?
Need ideas on how to get his done? Well there are probably many ways, but here is one suggestion. In between each drill, I have my players shoot two Free Throws and record their makes and misses. They can also get a sip during this time. They can also take additional Free Throws if they want, as long as they don’t disrupt or delay the practice. Boom! Your players are managing their own water intake, they are recording their own scores, and they are time managing so they can smoothly get into the next drill. As a coach you have the extra bonus of getting game-like Free Throws into your practice. Shooting two Free Throws when your players are tired from a drill is just like a stop in play where you have to shoot two Free Throws in a game.
I’m old, old enough to remember that in order to get a drink of water during school I would have to raise my hand and ask for permission. Today it is common for students to have a bottle of water on their desk. Which method is more humane and less disruptive? Do you really want that much control? Do you really want to answer the question “can I get a drink of water”? I have three children. Those parents with multiple children know if you have to explain something once, surely you will have to do it for as many children you have. The same holds true if you are the type of coach that needs to grant permission for a drink of water. Don’t you want your players to learn how to manage that, as long as it doesn’t affect or delay your practice?
Need ideas on how to get his done? Well there are probably many ways, but here is one suggestion. In between each drill, I have my players shoot two Free Throws and record their makes and misses. They can also get a sip during this time. They can also take additional Free Throws if they want, as long as they don’t disrupt or delay the practice. Boom! Your players are managing their own water intake, they are recording their own scores, and they are time managing so they can smoothly get into the next drill. As a coach you have the extra bonus of getting game-like Free Throws into your practice. Shooting two Free Throws when your players are tired from a drill is just like a stop in play where you have to shoot two Free Throws in a game.
Mirror Work
Basketball players would do well to learn from boxers and dancers. Both boxers and dancers use mirror work to improve their techniques, footwork, coordination and alignment.
Working in front of a mirror to improve your shooting technique can be a very powerful tool. You should be able to observe your shot from the front and both sides. If you had to mirrors facing each other you could also look at your alignment from the back.
If the mirrors are long enough you can even focus on your footwork, making sure you are shoulder width apart, that you are powering up through both feet etc.
You don’t need to go to a facility that has full length mirrors. You can check out your shooting mechanics in your bathroom with or without a ball. When I was young and working on my game outdoors at the local school, I would practice my form looking at my reflection in the school window. I would also work on my ball-handling doing the same, looking in the window at my reflection. Great way to keep your head up.
Hey if you have a video camera and you have someone willing to shoot you will you work out from front, back and both sides, fantastic. Sometimes you have to use the tools that are all around you.
Do yourself a favour and incorporate mirror work into your daily routine.
Working in front of a mirror to improve your shooting technique can be a very powerful tool. You should be able to observe your shot from the front and both sides. If you had to mirrors facing each other you could also look at your alignment from the back.
If the mirrors are long enough you can even focus on your footwork, making sure you are shoulder width apart, that you are powering up through both feet etc.
You don’t need to go to a facility that has full length mirrors. You can check out your shooting mechanics in your bathroom with or without a ball. When I was young and working on my game outdoors at the local school, I would practice my form looking at my reflection in the school window. I would also work on my ball-handling doing the same, looking in the window at my reflection. Great way to keep your head up.
Hey if you have a video camera and you have someone willing to shoot you will you work out from front, back and both sides, fantastic. Sometimes you have to use the tools that are all around you.
Do yourself a favour and incorporate mirror work into your daily routine.
Monday, July 19, 2010
There Is a Reason There Is a Nail At The FT Line - Part 4 of 4
11. Finish and Follow Through: On your shooting arm you elbow should be locked out.Your elbow should be higher than your brow on the release.Your guide hand should be above your brow, with fingers pointed at the ceiling or slightly forward but still spread.You should hold your finish till the ball goes in or hits the rim.
If you are not locking out your elbow and you are not holding your finish, you will not have a consistent shot. Locking out your elbow is a consistent end point. You know it’s the same each time.Your elbow should be above your brow to get the proper lift on the ball. Discourage younger players from shooting 3’s. Teach fundamentals of getting to the rack and the mid-range game. I see kids that are younger with good accuracy but I know they will have to change their mechanics as they grow. To gain distance they are chucking the ball with their elbows below their brow, instead of using the upward force of their legs.

If your Guide Hand turns in you will be effecting the rotation of the ball. The ball should be shot out of teh Guide Hand. It's a one hand shot.
Example Of Thumbing The Shot With Guide Hand

12. Determining Dominant Eye: The path of the ball should move through your shot pocket come close to, but not obstructing your dominant eye. You can determine your dominant eye by the following method.
a) Extend your arms in front of you with your palms facing away. Bring your hands together, forming a small hole by crossing the thumbs and fore fingers.
b) Choose a small object about 15-20 feet away from you. With both eyes open, focus on the object as you look through the small hole.
c) Close one eye and then the other. When you close one eye, the object will be stationary. When you close the other eye, the object should disappear from the hole or jump to one side.
d)If the object does not move when you cover one eye, then that eye is dominant. The eye that sees the object and does not move is the dominant.
It is possible to have a dominant eye opposite to your dominant hand. In fact two of my children are built this way. This means when shooting the ball with their dominant hand the ball can move through their shot pocket closer to the middle of their face. Remember you want to bring the ball close to the dominant eye, but not obstructing it.

13. Eye Contact: As mention in “what are we trying to do” You need to train your eyes on the back of the rim. To read about the math behind a perfect shot click here. A perfect shot is one that drops through, hits the floor, and slowly bounces back to you. Don’t watch the flight of the ball. Keep your eyes on your target.
14. Simple Routine: I tell my players that I don’t care what they do, as long as it’s 1 dribble, 2 dribbles or 3 dribbles. I am a 3 dribble guy. I also tell them I don’t care what routine is, as long as they get a chance to make eye contact for the same amount of time it takes to do their routine. Ok, then with FIBA rules and 5 seconds to shoot the ball. Your routine should be efficient and consistent. You want to kiss your biceps or your wrist or spin it around your waist for each member of your family, that’s fine. If you shoot greater than 90%. Once you are doing that, you have earned the right. Having a routine at the free throw line will ease the tension.
15. Mental Aspect: Once the player has proper shooting mechanics, mental mistakes are the main reason why a player misses free throws. The Free Throw is a unique event in basketball, and therefore, a unique skill. It is the only moment when the action stops, but play continues.
The action stops and waits for the shooter who has, depending on the rules 10 or 5 seconds to concentrate, focus, think and shoot. Since you are shooting the same shot from the same spot, with no defensive pressure, the target if fixed, it is the mental aspect that is responsible for most misses.
If a players begins to think about the importance of the shot or the consequences of a miss they will feel pressure. When players feel pressure, they get tense. Tense muscles fail to perform smoothly and shots are missed. Players need to allow their bodies to do what it has done countless times in practice and games; make the shot! Michael Jordan said: "I never looked at the consequences of missing a big shot. Why? Because when you think about the consequences, you always think of a negative result."
The mind cannot focus two things at once. You can not have internal negative thoughts and focus on making your shot. One will replace the other. The focus must be on the target, not on inner doubts, to shoot optimally.
Players should approach the free throw with a positive mindset. For players that become expert in visualization, a good approach is to close one's eyes and visualize a perfect free throw.
Their routine can include a deep breath and a strong exhale. This change in deep breathing can help center and relax the player.
Many players do well with having a mantra or anchor word. For one of my players I had him breathe in deeply through his nose, then exhale through his moth and say the word quotient on the breath out. Certain words can evoke calm. For me, when I played;
a) Deep breath in, with exhale thought the mouth.
b) Internal voice “get in”.
c) Bounce ball three times focusing on the same spot on the floor with each bounce.
d) Focus on the rim, and let my body take over.
If you are not locking out your elbow and you are not holding your finish, you will not have a consistent shot. Locking out your elbow is a consistent end point. You know it’s the same each time.Your elbow should be above your brow to get the proper lift on the ball. Discourage younger players from shooting 3’s. Teach fundamentals of getting to the rack and the mid-range game. I see kids that are younger with good accuracy but I know they will have to change their mechanics as they grow. To gain distance they are chucking the ball with their elbows below their brow, instead of using the upward force of their legs.

If your Guide Hand turns in you will be effecting the rotation of the ball. The ball should be shot out of teh Guide Hand. It's a one hand shot.
Example Of Thumbing The Shot With Guide Hand

12. Determining Dominant Eye: The path of the ball should move through your shot pocket come close to, but not obstructing your dominant eye. You can determine your dominant eye by the following method.
a) Extend your arms in front of you with your palms facing away. Bring your hands together, forming a small hole by crossing the thumbs and fore fingers.
b) Choose a small object about 15-20 feet away from you. With both eyes open, focus on the object as you look through the small hole.
c) Close one eye and then the other. When you close one eye, the object will be stationary. When you close the other eye, the object should disappear from the hole or jump to one side.
d)If the object does not move when you cover one eye, then that eye is dominant. The eye that sees the object and does not move is the dominant.
It is possible to have a dominant eye opposite to your dominant hand. In fact two of my children are built this way. This means when shooting the ball with their dominant hand the ball can move through their shot pocket closer to the middle of their face. Remember you want to bring the ball close to the dominant eye, but not obstructing it.

13. Eye Contact: As mention in “what are we trying to do” You need to train your eyes on the back of the rim. To read about the math behind a perfect shot click here. A perfect shot is one that drops through, hits the floor, and slowly bounces back to you. Don’t watch the flight of the ball. Keep your eyes on your target.
14. Simple Routine: I tell my players that I don’t care what they do, as long as it’s 1 dribble, 2 dribbles or 3 dribbles. I am a 3 dribble guy. I also tell them I don’t care what routine is, as long as they get a chance to make eye contact for the same amount of time it takes to do their routine. Ok, then with FIBA rules and 5 seconds to shoot the ball. Your routine should be efficient and consistent. You want to kiss your biceps or your wrist or spin it around your waist for each member of your family, that’s fine. If you shoot greater than 90%. Once you are doing that, you have earned the right. Having a routine at the free throw line will ease the tension.
15. Mental Aspect: Once the player has proper shooting mechanics, mental mistakes are the main reason why a player misses free throws. The Free Throw is a unique event in basketball, and therefore, a unique skill. It is the only moment when the action stops, but play continues.
The action stops and waits for the shooter who has, depending on the rules 10 or 5 seconds to concentrate, focus, think and shoot. Since you are shooting the same shot from the same spot, with no defensive pressure, the target if fixed, it is the mental aspect that is responsible for most misses.
If a players begins to think about the importance of the shot or the consequences of a miss they will feel pressure. When players feel pressure, they get tense. Tense muscles fail to perform smoothly and shots are missed. Players need to allow their bodies to do what it has done countless times in practice and games; make the shot! Michael Jordan said: "I never looked at the consequences of missing a big shot. Why? Because when you think about the consequences, you always think of a negative result."
The mind cannot focus two things at once. You can not have internal negative thoughts and focus on making your shot. One will replace the other. The focus must be on the target, not on inner doubts, to shoot optimally.
Players should approach the free throw with a positive mindset. For players that become expert in visualization, a good approach is to close one's eyes and visualize a perfect free throw.
Their routine can include a deep breath and a strong exhale. This change in deep breathing can help center and relax the player.
Many players do well with having a mantra or anchor word. For one of my players I had him breathe in deeply through his nose, then exhale through his moth and say the word quotient on the breath out. Certain words can evoke calm. For me, when I played;
a) Deep breath in, with exhale thought the mouth.
b) Internal voice “get in”.
c) Bounce ball three times focusing on the same spot on the floor with each bounce.
d) Focus on the rim, and let my body take over.
Saturday, July 17, 2010
There Is a Reason There Is a Nail At The FT Line - Part 3 of 4
3. Don’t be a slave to the T formation: Depending on your body mechanics this T formation might be a stylized T. It is a term that should not be taken literally, with a perfect 90 degree angle. You’ll find with most players if you make a perfect 90 degree T formation with their thumbs, their guide arm will come up so that it’s parallel to the ground. This creates tension in their guide shoulder. You do not want tension in your shot. You want to be relaxed in your shot. Your guide hand should be upward facing fingers pointed at ceiling OR slightly forward. You should not be able to see your last two digits, and with these two fingers you should be able to balance the ball.
Perfect 90 Degree T Formation With Thumbs

As A Result Tension In Guide Arm,Elbow Pointing To Wall

Stylized T Formation With Thumbs

Relaxed Guide Arm Elbow Pointing At Floor

4. Hand Placement: Your hands should not be flat on the ball. It is a misconception that more surface area touching the ball the better control. If your hands are flat on the ball, you will draw the ball back too far to the crown of your head and catapult the ball. Use finger tips and finger pads on both hands. Also your fingers should be spread on both hands. Since we are at the Charity Stripe, let us gain more control over the ball by making sure our index finger is pointing at the air valve, and it is on the seem of the ball.
Finger Pads and Tips On Both Hands Creates A Gap And Better Control

5. Shooting Arm At 90 Degree: And your arm should be in a 90 degree angle. Watch Nash even on a fade-away J, he doesn’t vary from this 90 degree angle. Too much or too little angle will take away from your arc and harden your shot.
At 90 Degrees A Basketball Will Fit Will Fit Between Your Bicep,Forearm And Hand

6. Elbow Over Knee: Your shooting elbow should be over your shooting knee.

7. Wrinkled Wrist: Your wrist should be bent back so the ball can rest in it. Players that start with their wrist as a straight extension of their forearm will tend to bring the ball back to the crown of their head or further in-order to get their wrist parallel to the floor. The result is a catapult shot that is hard and without arc.

8. Shot Pocket: You should have the ball in your shooting pocket and you should leave from your low stance. Don’t go high-to-low-to-high. Go low-to-high. Again we are trying to give lift to the ball with our bodies, and guide the ball in its flight with are arm and hand. To read more about Shot-pockets read Quick Draw Blog.

9. Power Through Both Feet: transferring your weight to the balls of your feet. Not your toes. You want to remain balanced. Don’t jump; just use the up-force from your lower body to lift the ball. The muscles and joints of your lower body are far less complicated that the muscles and joints of your upper body. We want to minimize variables in motion in your shot. We want to make it efficient.

When a player’s stance is too narrow, you will often see them become unbalanced. With girls we see you often get what I call the squirrel tail. Their guide arm will whip out to their side to maintain their balance much like a squirrel’s tail flips from side to side, while they run across a hydro-line. With boys it’s falling forward or backwards from the line. With your stance shoulder width apart and transferring the force from heels to balls of your feet, you will remain balanced.
Exmple Of Squirrel Tail Guide Arm

10. Break 1 not 4: As stated in the Shot Pocket section, we want to shot the ball with our body, and direct it with our arms and hands. We want to eliminate as much motion in our upper bodies as possible. The joints in your shoulder, elbow and hands are more complicated in their motion then knees and hips. Breaking your knuckles can add a 5 degrees change in your shot per knuckle. The motion in the hand should be a flop motion. Your fingers should be spread and pointing towards the rim. If you watch this action in slow motion, when done properly you will notice a slight bounce. The thumb should be tucked under in this motion to send the ball off the peace sign fingers (index and middle fingers). So we break the wrist (one joint), lets call that breaking one. We do not want to point our fingers to the ground. That would be breaking four joints. 5 degrees times * 12) Avoid using terms like “reach in the cookie jar” or goose neck when teaching. Mimicking these actions will have players breaking 4. Back spin rotation; too much too little. Breaking 4 will surely put too much spin on it making shot harder and deflections off the rim lessen the chance of it sitting up softly and dropping through.
Example Of Breaking One
Fingers on both hands remain spread.

Example Of Breaking 4

Perfect 90 Degree T Formation With Thumbs

As A Result Tension In Guide Arm,Elbow Pointing To Wall

Stylized T Formation With Thumbs

Relaxed Guide Arm Elbow Pointing At Floor

4. Hand Placement: Your hands should not be flat on the ball. It is a misconception that more surface area touching the ball the better control. If your hands are flat on the ball, you will draw the ball back too far to the crown of your head and catapult the ball. Use finger tips and finger pads on both hands. Also your fingers should be spread on both hands. Since we are at the Charity Stripe, let us gain more control over the ball by making sure our index finger is pointing at the air valve, and it is on the seem of the ball.
Finger Pads and Tips On Both Hands Creates A Gap And Better Control

5. Shooting Arm At 90 Degree: And your arm should be in a 90 degree angle. Watch Nash even on a fade-away J, he doesn’t vary from this 90 degree angle. Too much or too little angle will take away from your arc and harden your shot.
At 90 Degrees A Basketball Will Fit Will Fit Between Your Bicep,Forearm And Hand

6. Elbow Over Knee: Your shooting elbow should be over your shooting knee.

7. Wrinkled Wrist: Your wrist should be bent back so the ball can rest in it. Players that start with their wrist as a straight extension of their forearm will tend to bring the ball back to the crown of their head or further in-order to get their wrist parallel to the floor. The result is a catapult shot that is hard and without arc.

8. Shot Pocket: You should have the ball in your shooting pocket and you should leave from your low stance. Don’t go high-to-low-to-high. Go low-to-high. Again we are trying to give lift to the ball with our bodies, and guide the ball in its flight with are arm and hand. To read more about Shot-pockets read Quick Draw Blog.
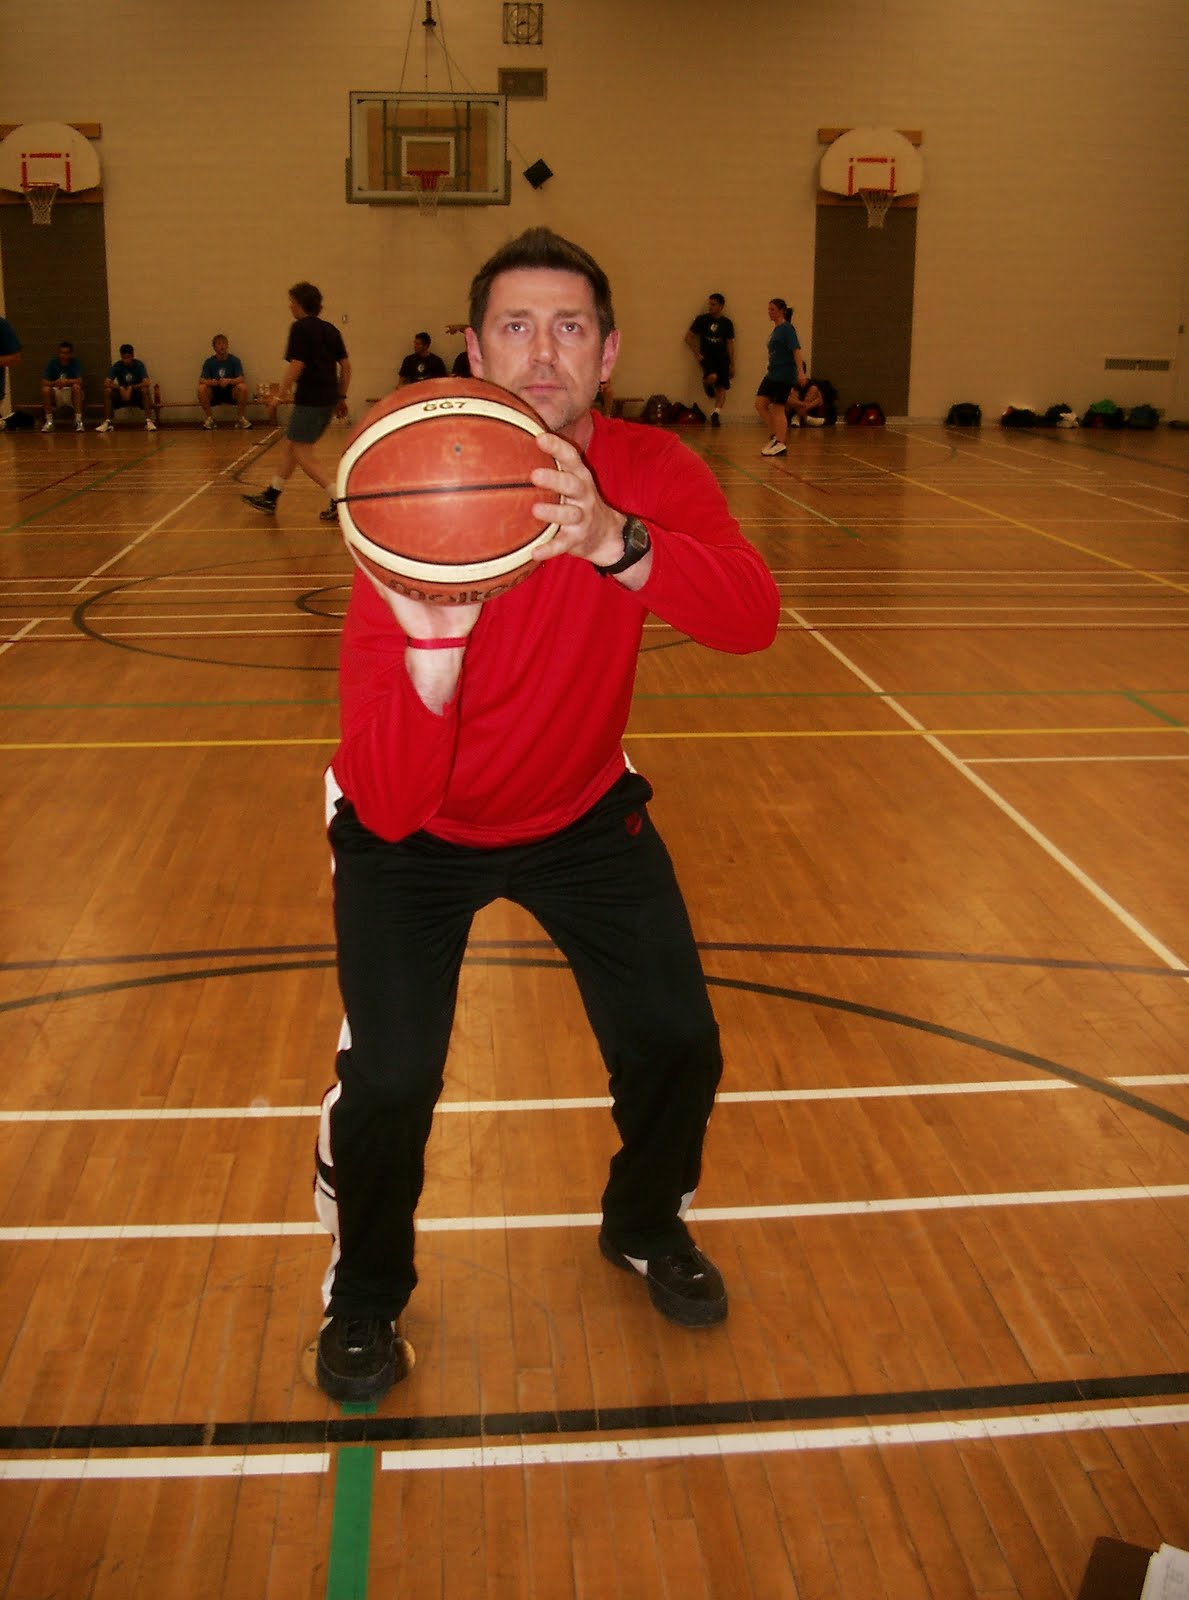
9. Power Through Both Feet: transferring your weight to the balls of your feet. Not your toes. You want to remain balanced. Don’t jump; just use the up-force from your lower body to lift the ball. The muscles and joints of your lower body are far less complicated that the muscles and joints of your upper body. We want to minimize variables in motion in your shot. We want to make it efficient.

When a player’s stance is too narrow, you will often see them become unbalanced. With girls we see you often get what I call the squirrel tail. Their guide arm will whip out to their side to maintain their balance much like a squirrel’s tail flips from side to side, while they run across a hydro-line. With boys it’s falling forward or backwards from the line. With your stance shoulder width apart and transferring the force from heels to balls of your feet, you will remain balanced.
Exmple Of Squirrel Tail Guide Arm

10. Break 1 not 4: As stated in the Shot Pocket section, we want to shot the ball with our body, and direct it with our arms and hands. We want to eliminate as much motion in our upper bodies as possible. The joints in your shoulder, elbow and hands are more complicated in their motion then knees and hips. Breaking your knuckles can add a 5 degrees change in your shot per knuckle. The motion in the hand should be a flop motion. Your fingers should be spread and pointing towards the rim. If you watch this action in slow motion, when done properly you will notice a slight bounce. The thumb should be tucked under in this motion to send the ball off the peace sign fingers (index and middle fingers). So we break the wrist (one joint), lets call that breaking one. We do not want to point our fingers to the ground. That would be breaking four joints. 5 degrees times * 12) Avoid using terms like “reach in the cookie jar” or goose neck when teaching. Mimicking these actions will have players breaking 4. Back spin rotation; too much too little. Breaking 4 will surely put too much spin on it making shot harder and deflections off the rim lessen the chance of it sitting up softly and dropping through.
Example Of Breaking One
Fingers on both hands remain spread.

Example Of Breaking 4

Wednesday, July 14, 2010
There Is a Reason There Is a Nail At The FT Line - Part 2 of 4
So what are we trying to do?
Firstly: we are trying to throw the ball in a straight line. I hate the word throw when it comes to basketball. Makes it sound like there is not much to it.
Secondly: we are trying to throw the ball up instead of out; gravity becomes your friend and kills the speed of the ball. You want a slow shot. The more vertical you shoot, the better gravity works to your advantage by slowing the ball down. As it starts to descend toward the target there is only the weight of the ball, approximately 24 ounces, propelling it. This also results in a soft shot that has a better chance to bounce in if slightly off line, or for a close-in rebound. The ball at its peak height should be about 1 meter above the rim (approximately the top of the backboard) when it is about 1 meter away from the rim.
Thirdly: We are trying to change the size of the target, the ball goes through. Although the rim does not actually change size, it will appear differently to the ball depending on the angle it enters the rim and its closeness to the back of the rim.
That’s right the target is close to the back of the rim. Forget what you have been told about the front of the rim or aim for the middle, as if you can aim for the middle of the rim. For the mathematics to prove this click here
Here is the break down on missed shots from the Free Throw Line. You can see that as long as you are shooting in a straight line you have a pretty good chance of putting it in. We can also see the majority of shots missed are short. It’s important that you aim at the back of the rim.
• 5 % left, 5% right, 5% long 85% short
1. Feet Shoulder Width Apart: Your feet should be staggered and shoulder width apart
• Your feet fit like a puzzle. The curved ball of the inside of one foot fits into the insole of the other foot. This is a good way to judge how staggered you stance should be. Your shooting foot should be forward but no more than 6 inches ahead.

• Line your shooting foot up with the nail in the FT Line. It’s directly in front of the rim, and you want to shoot directly towards the rim. We are trying to shoot with our body’s up-force and guide the flight of the ball with our arm and hand. If you straddle the line, then your arm has to move across your body to shoot the ball towards the rim.
Some prefer perfect feet where all ten toes point at the rim. This is a good approach,

But if you find you have tension in your upper body, as a result of perfect feet open your stance so that your guide foot is angled outward slightly.

2. Athletic Stance: Everything you do in basketball should start with an athletic stance.
o Stance shoulder width apart
o Back straight, leaning slightly forward
o Hips low
o Legs at a less than 90 degree angle


Firstly: we are trying to throw the ball in a straight line. I hate the word throw when it comes to basketball. Makes it sound like there is not much to it.
Secondly: we are trying to throw the ball up instead of out; gravity becomes your friend and kills the speed of the ball. You want a slow shot. The more vertical you shoot, the better gravity works to your advantage by slowing the ball down. As it starts to descend toward the target there is only the weight of the ball, approximately 24 ounces, propelling it. This also results in a soft shot that has a better chance to bounce in if slightly off line, or for a close-in rebound. The ball at its peak height should be about 1 meter above the rim (approximately the top of the backboard) when it is about 1 meter away from the rim.
Thirdly: We are trying to change the size of the target, the ball goes through. Although the rim does not actually change size, it will appear differently to the ball depending on the angle it enters the rim and its closeness to the back of the rim.
That’s right the target is close to the back of the rim. Forget what you have been told about the front of the rim or aim for the middle, as if you can aim for the middle of the rim. For the mathematics to prove this click here
Here is the break down on missed shots from the Free Throw Line. You can see that as long as you are shooting in a straight line you have a pretty good chance of putting it in. We can also see the majority of shots missed are short. It’s important that you aim at the back of the rim.
• 5 % left, 5% right, 5% long 85% short
1. Feet Shoulder Width Apart: Your feet should be staggered and shoulder width apart
• Your feet fit like a puzzle. The curved ball of the inside of one foot fits into the insole of the other foot. This is a good way to judge how staggered you stance should be. Your shooting foot should be forward but no more than 6 inches ahead.

• Line your shooting foot up with the nail in the FT Line. It’s directly in front of the rim, and you want to shoot directly towards the rim. We are trying to shoot with our body’s up-force and guide the flight of the ball with our arm and hand. If you straddle the line, then your arm has to move across your body to shoot the ball towards the rim.
Some prefer perfect feet where all ten toes point at the rim. This is a good approach,

But if you find you have tension in your upper body, as a result of perfect feet open your stance so that your guide foot is angled outward slightly.

2. Athletic Stance: Everything you do in basketball should start with an athletic stance.
o Stance shoulder width apart
o Back straight, leaning slightly forward
o Hips low
o Legs at a less than 90 degree angle


Subscribe to:
Posts (Atom)